Showing posts with label DIY. Show all posts

DIY: Valentines Inspired Bird Feeders

Thursday, February 9, 2017

Alright who else on the West Coast got swallowed up by a blanket of white stuff? I may be the only one, but I actually really enjoyed the big dump. It made everything a beautiful winter wonderland. The shoveling sucked, but I did get lots of exercise and fresh air. The power didn't go out for very long (YAY BC Hydro!). And I got lots of projects finished up that I kept pushing to the side!

Heart shaped bird feeders was one of those projects we knocked off the to do list, (original recipe found over HERE). Zach helped me with this valentines craft and it was relatively quick and painless. While the kids lunched I whipped up the ingredients (no this isn't a "naptime craft" says the mother of three :P). When Zach was ready he helped me scoop the birdseed concoction into a heart cookie cutter, I popped them out and that was it! As Rylee would say, "Easy Peasy Lemon Squeesy."


Supply List:
Cookie Sheet
Parchment Paper
Twine
Cookie Cutter
Cooking Spray
Straw/Chopstick/or Bamboo skewer
Mixing Bowl

Ingredients:
6 Tbsp Flour
1.5 Tbsp Corn Syrup
1/2 an envelope of unflavoured Gelatin
1/4 cup Water
2 Cups Bird Seed (I just bought ours in bulk from the pet section of the grocery store)
*this recipe makes approximately 12 hearts in a 2" heart cookie cutter

What You Gotta Do:
Step 1: Add your flour, corn syrup, gelatin, and water into a bowl and mix until they resemble liquid glue. Add your birdseed and mix it all together.


Step 2: Line your cookie sheet with parchment paper. Spray the inside of your cookie cutter with cooking spray. (You will need to respray your cookie cutter every couple hearts)

Step 3: Place your cookie cutter on parchment paper and fill with birdseed mix, pressing down firmly to pack it in. 


Step 4: Using your skewer poke a hole through the heart. 


Step 5: Remove heart from cookie cutter carefully and place on parchment paper to dry (I let mine sit 24hrs but that was overkill, 8hrs is probably good). 


Step 6: Insert twine through the hole, (if your hole closed over while drying, don't panic, just reinsert your skewer), tie a knot and your done! Attach a tag if your giving as a gift or just go hang it outside and watch the birdies come!

DIY: Recycled Valentines Crayons

Sunday, January 29, 2017

If you are like us, storing the mother load of old broken crayons, hoping one day the kids will give them another chance knowing full well it will never happen... then worry not, and waste not my friends this little diy is for you! Give those useless, unwanted crayons a new life by breaking them down, melting them, and creating brand new fun shaped crayons. Your kids will love them, and it makes for a great gift!

This craft is easy enough for your kids to help out, has minimal mess, and basically free! 


What you will need:
Crayons
Baking sheet
Silicone ice cube trays (IKEA has cute ones for $1! And fyi you will never get the wax out of them, go cheap on this one.)

Step 1: Remove the wrappers off the crayons. This I discovered is a great way to distract your kids all afternoon, with their hands at work and their excitement level to make something, they are more than eager to stick to this project (disclaimer: not all kids will behave accordingly, haha). 


**Optional** Step 2: Sort crayons into like colors. This is only if you are planning on making solid or ombre like color schemes. Otherwise if your don't care what colors your new crayons turn out then do not worry about this step.


Step 3: Break up your crayons into 1/2" or less pieces, the smaller the pieces means they melt quicker and less chance of colors bleeding together while baking.

Step 4: Preheat your oven to 200 degrees. While your waiting, sort your colors into your molds, fill them till their slightly overfull.


Step 5: Stick your molds on a baking tray (you do not want this spilling in your oven... it will be your worst nightmare), and if your concerned at all for your baking sheet you can put wax/parchment paper down to protect it. Leave to bake for 10 to 15 minutes or till crayons are completely melted.


Step 6:
Remove from oven (carefully!) and let cool in tray till hardened. 

DIY : Mason Jar Vase

Sunday, July 31, 2016

I have been wanting to make some decorative mason jar vases for some time now. Finally I have done it! It was the easiest thing ever, and so super inexpensive! The first thing I used our newly repurposed mason jar vase was to hold some lovely flowers (found at a local roadstand, can't get better than that) for Adelyne's first birthday.

All you need:

A mason jar (I used a pint, but whatever size you want)
Spray paint (I used Kryllon Colormaster in Brilliant Gold, found at our local Home Hardware) 
Piece of cardboard
Sandpaper (optional)

Instructions:
Give your paint a good shake, and a test spray. Turn your mason jar upside down on the cardboard and have at 'er! I started with the bum of the jar and worked my way down, for the first coat keep it thin, it will be slightly transparent, but make sure you cover every spot.
Wait 15 to 20 mins for first coat to dry and then apply a second coat and let it dry. At this point you can lightly use your sandpaper to give it a rustic look.

Dream Big Little One

Monday, July 25, 2016

Way back to when I was pregnant with Adelyne I was drawn to the saying "Dream big little one", it was actually one of the first things I set up when making a space for her in the kids room (check it out here). This little phrase was the whole inspiration behind her little bohemian themed party we had yesterday to celebrate her upcoming first birthday!

The day couldn't have been more perfect, the weather was beautiful, there was space for us at the park, and the kids had their naps prior to it all making for a good + happy time for all!

I have to say I wish all my kids birthdays were in the summer, outdoor parties are way easier! I had very minimal decorations (and even less because I forgot one at home... duh!) and had a playground and beach to keep the kids entertained, add in some lawn chairs and some yardzee and badda bing badda boom adults are happily entertained too.

Biggest priority was making sure there was plenty of yummy food! On the menu was Apple Blackberry Crumble, chocolate haystacks, strawberry pink lemonade, watermelon, veggies + dip, a little something we call "bonuts".... a donut recipe gone wonderfully wrong haha, what should have been donuts turned out to be yummy biscuit-like cookies. And most importantly Adelyne's very first birthday cake (A pink velvet cake, inspiration and recipe found here) that is quite honestly my pride and joy of the whole party (apart from Adelyne of course haha).

DIY : Handprint Keychain

Friday, June 17, 2016

For Father's Day this year the kids got to help in making a special little keepsake for their Daddy. A DIY version of shrinky dinks (A special overpriced piece of paper that shrinks when heated in the oven and makes hard miniature keepsakes).

All you need is some clean flat #6 plastic, which I think are easily found in the deli dept. of grocery stores, ours came from sushi to go containers and a top from a fruit tray. You could also go scavenge your local recycling depot if don't want to specifically go out and buy food just for the plastic. 

The next thing you need are something to colour your plastic with, we used Sharpies, but I've read you can use felt pens, acrylic paint, and pencil crayons (but not cheap ones), keep in mind however that I have no tried those options and have no idea how they would turn out (let me know if you try, would love to know how they turn out).


First things first for our project is we traced the kids hands and then I cut them out and traced a thicker line around the edges with black Sharpie. Then the fun part, hand it over to the kids with a plethora of colours to choose from, I'm going to be honest I literally had to bite my perfectionist tongue to let them be and design their hand however they wanted... end result they turned out to be beautiful toddler scribbled messes, just the way they should be! Last but not least I hole punched them and wrote their name and the year with a fine tip Sharpie (do this on the side they coloured on... it turns out better).

(If your kids are older or you want something different you can always print out a picture of a favourite character or animal and place it under the plastic to trace the outlines and let them color it in.)


While your waiting for the kids to finish colouring preheat your oven to 300 degrees, line a tray with foil or make a tray out of aluminum foil by folding up the sides. Once your kids are done put their little pieces of art in the tray and turn your oven light on so you can watch what happens! In the first minute you'll see them curl up and shrivel and you'll panic a little thinking this is going horrible wrong, wait... just wait! They will begin to flatten out and thats when you know their done... takes about a minute and a half. Bigger pieces might take a little longer... key is to just wait for them to flatten out. 


Take them out of the oven, let them cool for a minute or two, if they need a little extra flattening it is essential to do it in the first 10 seconds while their still hot, hot, hot! After they're cool they are free to be played with! Once the kids were done having fun with them I painted some coats of modpodge on them to hopefully help keep them intact while being banged around with keys... we'll see how they hold up.

DIY : Allstar Baseball Party

Saturday, January 23, 2016

Last weekend we threw an all star baseball party for Zachery's second birthday! It was a whole lot of fun and so fitting for our little sports lover.

If there are any other little baseball lovers out there with summer birthdays than this is the theme for you! We however just had to make the best of the indoors with our dreary January weather. Regardless of indoor/outdoor this theme was actually very simple to put together, which is handy if your life is like mine...FULL!

So first things first Rylee and I made a baseball piñata... think batting practice! This was a fun craft for her and me and it was cool to be able to teach her how to paper mache for the very first time! If you've never paper mache'd before, its super easy you just need to allow for drying time (however a blow dryer does wonders if your in a pinch). All you need is old newspaper or scrap paper (cut in 1 in. wide strips), a balloon, flour and water (mix smooth 1 to 1 ratio). Blow up your balloon, dip your strips in flour paste and apply to balloon overlapping a bit and leaving a hole at the top of balloon to add candy's. Let dry for 24hrs. I tied string around the balloon so that it could be hung later on and then put another layer on. Let dry 24 hrs. Pop balloon and pull it out. Insert Candy. Apply two layers over hole (allowing time to dry in between layers). Apply third layer with plain white paper strips. Paint white and allow to dry. Paint red stitches and allow to dry. And just like that your done!


In addition to the piñata we also played "Pin the Ball on the Bat". I just cut out some cardboard in the shape of a bat and printed out some baseballs and attached some scotch tape to the back to make them stick (obviously :P).


Next thing I made was the concession flag to hang over the snacks. I just used white cardstock for the flags. And I downloaded this baseball worthy font, and printed out the letters to trace onto red cardstock, cut them out and glue them to the white flags. A fun little thing we did for the kids was give them tickets that they could buy their own snacks from the concession. For additional decorations I used red sharpie to draw stitching on white balloons to make baseballs and hung them from the ceiling. I also used the kids baseball gloves as some added décor in the concession stand.


For food we went with the baseball classic, hot dogs, how can you not?! Then we had Baby Babe Ruth chocolate bars which I found at Walmart. We had snack size chips and popcorn (which could easily be substituted with Cracker Jacks...I wanted to but just didn't have time to make it). For drinks we had lemonade and last but not least the birthday cup"cake" was in the form of a baseball glove (with a HORRIBLE marshmallow baseball... definitely a Pinterest fail right there!).


**Some extra ideas for a summer party would be a slip 'n' slide for sliding practice, a board with cut outs for some good ol' pitching practice, and don't forget to pull out the BBQ for them hot dogs!


DIY : Princess Party

Saturday, November 14, 2015

We celebrated Rylee's fourth birthday just the other day. A sparkly pink princess party is one I never in a million years thought I'd be planning, but alas, my girl is one of the most girly girls there can be!

Everything I tried to do myself, my husband calls me insane, but honestly I have a lot of fun doing these themed parties. Its my creative outlet in my world of chaos. To another mom or parent it may seem crazy, and thats ok, but this is my niche, its something I'm happy doing... do what you love and love what you do, right!?

As our guests entered princess Rylee's kingdom we had swords for our little princes, made out of cardboard and felt. And for the little princesses there were crown headbands (dollarstore headbands, homemade fabric stiffener, lace ribbon, and gold paint),  and sparkly wands (felt, sequins, polyfill, and bamboo skewers).


In our party room our only decorations was a canopy overhead made of three dollarstore tablecloths cut in quarters and six balloons. I was so pleased with how it turned out and I can say I will probably never use streamers again... ever, this looks SO much better! 


And the hardest thing I created from scratch was this cupcake masterpiece. I am not a baker, it is not my forte and totally stresses me out. But, Rylee and I did a trial run a few weeks ago so I felt somewhat comfortable that I could make this happen, and although its not perfect, it far surpasses anything I have ever baked. I used this recipe for the cupcakes, and this recipe for the icing and used a 4B Wilton decorating tip. I finished it off with Wilton candy pearls and some dollarstore trinkets to make it look more like a princess dress. Everyone seemed to enjoy so I think I can say it was a success... a stressful, messy success!
For eats we kept it simple since it was an afternoon party. There were fruit wands, skewers of grapes and pineapples cut into star shapes; Cinderellas pumpkin patch, mandarin oranges with celery; and Cinderella's coach, chips with soardough loaf filled with artichoke dip (bread wheels attached with toothpicks) 
And last but not least our party favour, snow whites poisoned apples (minus the poison of course). Another first for me, candy apples and to add to the learning curve doing it without a candy thermometer... key phrase for that experience is "be patient, don't panic!" I'm not sure how they actually taste, haha, but it was more for the novelty!
Not pictured is our craft activity for the kids. We had some mosaic crowns the girls could decorate with jewel stickers. For the boys I cut shields out of foam and got felt pens, sparkly star and dragon stickers for them to decorate with. And additional entertainment was provided by queen Gramma Jamma who read the classic and my personal fave childhood story, "The Paperbag Princess" by Robert Munsch. 

DIY : Princess Scroll Invitations

Wednesday, November 11, 2015

Rylee decided she wanted a princess themed party for her fourth birthday this year. Well... actually she wanted a princess party, a Rapunzel party, and a doctor party.... she doesn't ask for much does she? Anyways we told her she had to pick one and the princess theme won out.

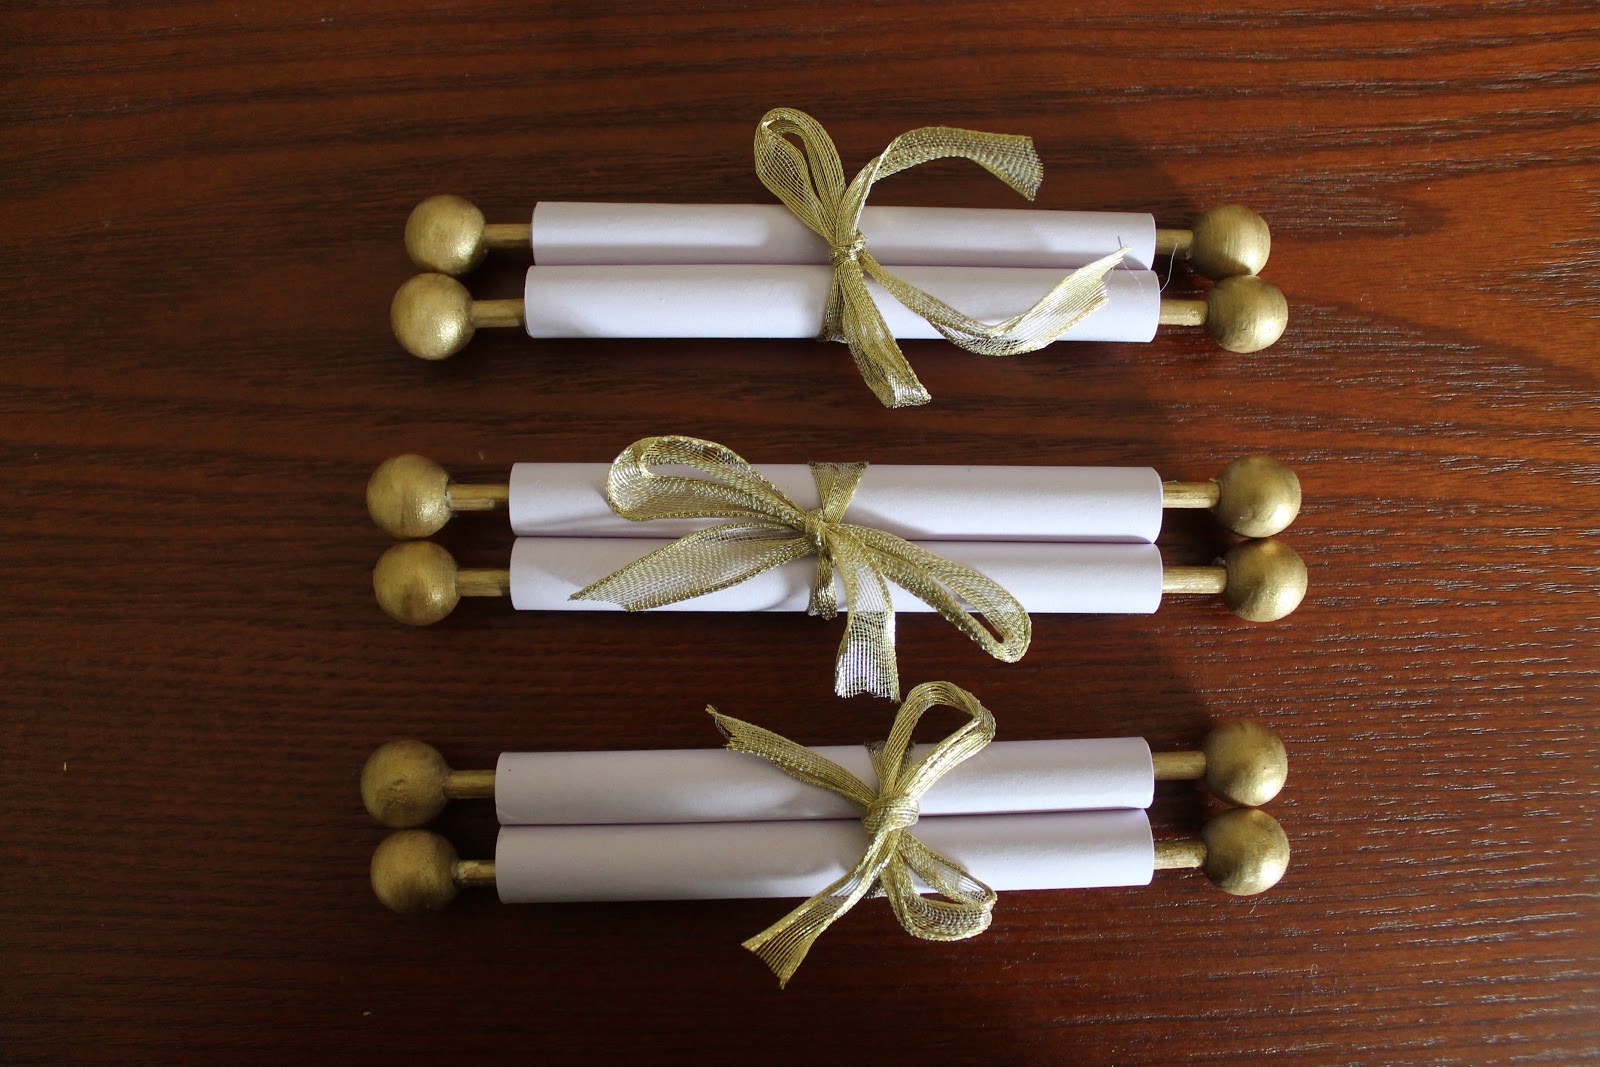
So the first matter of business to make it happen was to create none other than a royal scroll announcing the event! 

It'd turned out amazing and better than that it was actually quite simple to create.

All you need:
Glue
Paint (dollarstore)
Dowel sticks (dollarstore)
Wood Beads (Michaels)
8.5x11 Cardstock
Paintbrush

I first created the card in photoshop and printed it on cardstock (4 invitations per sheet). 

Rylee helped me paint the dowel rods and beads gold, it took two coats with acrylic paint. 

Once everything had dried I put the beads on the ends of the rods.

Then I put some good ol' elmers glue on the top edge of the card and applied the dowel rod. This was the hardest part, just waiting for the glue to adhere, but I found holding it for a minute and then starting to roll the cardstock around the rod help it form to the rod easier. Repeat this same process for the bottom of the card.

Once everything is attached roll the ends to meet in the middle and voila you have yourself a royal scroll! I added some star stickers to give it some sparkle and finished it off with some gold ribbon to keep it all together.

Related Posts Plugin for WordPress, Blogger...